How to Use a Meat Grinder: Assembly, Blade Direction, and Sizes
There’s a moment in every home cook’s life when a $7 pack of pre-ground chuck starts to feel like a small betrayal — you know it deserves better, and you’re not sure why. That’s usually when the idea of grinding your own meat arrives.
The machine itself has barely changed since an 1841 design credited to Karl Drais, according to Wikipedia (encyclopedic reference), and once you learn the one blade-orientation rule that everyone forgets, everything else clicks. After a few minutes with the assembly sequence, the difference between a loose steakhouse patty and a dense meatloaf one finally makes sense.
Year of invention: 1841 (Karl Drais) ·
Coarse burger plate: 3/8 in (10 mm) ·
Home grinder price: $30–$300 ·
Bone capacity: Small poultry bones only
Quick snapshot
- The blade’s flat cutting side faces the grinder plate (Home Depot product manual (manufacturer assembly guide)).
- The plate sets grind texture while the knife cuts against it — the division KaTom Restaurant Supply (commercial equipment guide) makes explicit.
- Bone capability depends on motor wattage and manufacturer ratings — there’s no universal spec (Wikipedia (encyclopedic reference)).
- Whether 3/8-inch or 1/4-inch is the “best” burger plate is a taste call, not a published standard (Salt Rail (home butcher equipment guide)).
- 1841: Karl Drais credited with the first hand-cranked design — the auger-and-plate principle survives today (Wikipedia (encyclopedic reference)).
- Start with a 3/8-inch coarse plate for a loose burger (Salt Rail (home butcher equipment guide)), then compare a 1/4-inch plate for a tighter patty.
Eight numbers, one pattern: the design has been stable since Karl Drais, and the blade rule hasn’t changed.
| Spec | Value |
|---|---|
| First credited design | 1841, Karl Drais |
| Common materials | Stainless steel, cast iron |
| Typical motor power (electric) | 500–1000 watts |
| Average lifespan | 5–10 years |
| Blade orientation | Flat cutting side toward the plate |
| Standard burger plate | 3/8 in (10 mm) coarse |
| Grinder size numbers | Head/plate dimensions, not coarseness |
| Bone handling | Heavy-duty electric only; small poultry bones |
How to Assemble a Meat Grinder
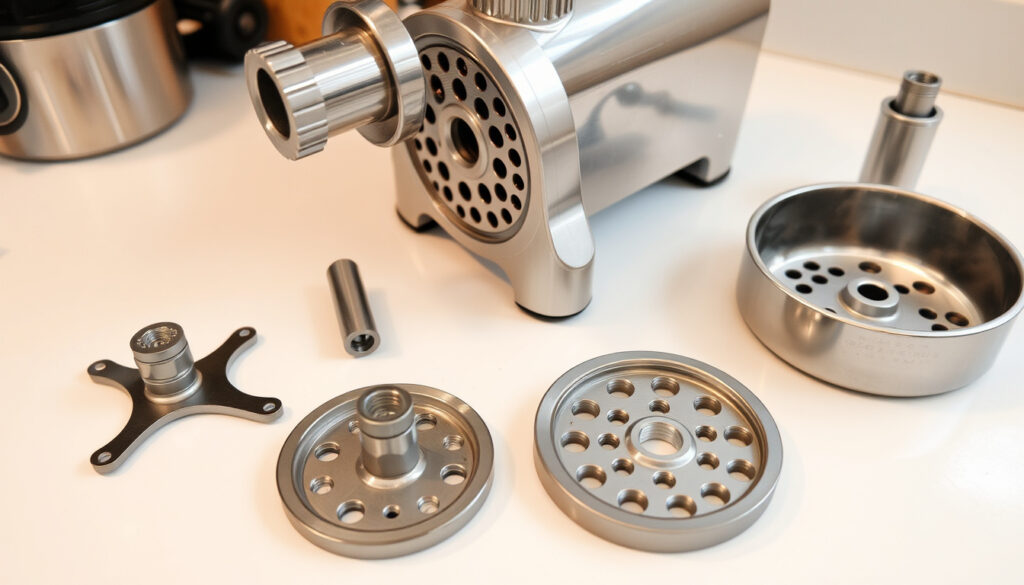
Assembly follows one order on nearly every home grinder: housing, auger, blade, plate, retaining ring. Get that stack right and the machine does the work; get it wrong and the meat just sits there. The sequence below applies to electric and manual models alike — the difference is what holds the plate in place: a ring on electric units, a large end nut on manual ones.
How to Assemble an Electric Meat Grinder
- Main housing with the auger channel
- Grind screw (auger) with square pin
- Cutting blade (four-point knife)
- Grinding plate with the hole size you want
- Retaining ring or head cover
- Stomper / pusher
Once the parts are clean and dry, assemble the head in this order:
- Push the auger fully into the housing until its square pin is visible at the front opening.
- Slide the cutting blade onto the square pin with its flat cutting side facing outward, toward the plate.
- Place the grinding plate over the blade; the knife blades should lie flat against the plate, and the plate is held in place by the retaining ring or head cover — a sequence the Home Depot product manual (manufacturer assembly guide) spells out directly.
- Tighten the retaining ring until the plate is snug, then check that the blade and plate sit flush by turning the auger by hand.
- Fit the feeding tray, keep the stomper within reach, and feed the first pieces before loading a full hopper.
How to Assemble a Manual Meat Grinder
- Same blade-and-plate stack: auger, blade, plate, then a large end nut instead of a retaining ring
- Clamp base secured to a sturdy counter
- Hand crank on one side, output spout on the other
- Clamp the base to a sturdy counter and insert the auger into the housing.
- Mount the blade with the flat cutting side facing outward — the same rule as the electric unit.
- Add the plate and tighten the large end nut until the stack is flush.
- Attach the crank and put a bowl under the output spout.
- Feed meat in small pieces and never overfill the hopper — a hand crank stalls faster than a motor.
The implication: the assembly is a sandwich — housing, auger, blade, plate, ring — and the blade is the filling that has to face the right way. Nail the stack once and every future grind takes 60 seconds.
Which Way Does the Blade Go in a Meat Grinder?
The blade slides onto the auger’s square pin, and its flat, sharpened side has to face outward toward the plate. The Home Depot product manual (manufacturer assembly guide) puts it bluntly: install the knife backward and it can’t cut correctly against the plate — you get pushed, smeared meat instead of a clean grind. The same manual is just as blunt about safety: feed with the pusher, never fingers, and never reach into the grinder while the blade or auger is accessible.
Once the blade sits flat against the plate, the texture work belongs to the plate’s hole size. KaTom Restaurant Supply (commercial equipment guide) states the division of labor plainly: the knife cuts the meat against the plate, and the plate determines the size and texture of the result.
Identifying the Blade Orientation
- The flat cutting side faces outward — toward the grinder plate, never the motor.
- The blade’s cutting edges must lie flat against the plate; a tilted blade means a gap, and a gap means smearing.
- The mounting pin is square — if the blade doesn’t seat flat, rotate it 180 degrees and try again.
Common Mistakes to Avoid
- Backward blade — the most common mistake; the knife never engages the plate, and output comes out torn, not cut.
- Overtightening the retaining ring — snug is correct, torque isn’t; a cracked plate or seized auger is the cost.
- Mixing size systems — KaTom warns that parts from different grinder-size systems may not fit or operate correctly.
- Reaching into the hopper while the motor is on — the auger will grab fingers faster than meat.
A backward blade turns a $300 grinder into a meat masher. The Home Depot manual’s warning is direct: the knife will not cut correctly against the plate if it’s installed backward.
The pattern: one backward blade explains most “my grinder mashes instead of minces” complaints. When output looks smeared, check the knife before you blame the meat.
What Grind Size Is Best for Burgers?
For burgers, texture is the point. A coarse grind leaves visible chunks of meat that stay juicy and loose on the grill; a fine grind turns the same chuck into a dense, sausage-like patty. The call belongs to the plate’s hole diameter, not the grinder’s size number — the point Salt Rail’s size guide makes when it separates plate sizing from machine numbering.
Best Grind Sizes for Different Dishes
- Coarse (3/8 in / 10 mm): loose, steakhouse-style burgers with pronounced texture.
- All-purpose (1/4 in / 6 mm): burgers, meatloaf, meatballs, tacos.
- Medium (3/16 in / 4.5 mm): uniform mixtures and second passes.
- Fine (1/8 in / 3 mm): sausage, bologna, and hot-dog-style mixes.
Six rows, one pattern: the smaller the hole, the smoother the bite, and the closer the output moves from burger toward sausage.
| Plate | Texture | Best for |
|---|---|---|
| 3/8 in (10 mm) | Coarse | Burgers with pronounced texture (Salt Rail (home butcher equipment guide)) |
| 1/4 in (6 mm) | All-purpose | Burgers, meatloaf, meatballs, tacos (Butcher’s Handbook (home butchering guide)) |
| 3/16 in (4.5 mm) | Medium | Uniform burger mixtures, second passes (Salt Rail (home butcher equipment guide)) |
| 1/8 in (3 mm) | Fine | Sausage, bologna, hot-dog mixtures (KaTom Restaurant Supply (commercial equipment guide)) |
| One coarse pass | Technique | Enough for a loose, visibly textured burger (Butcher’s Handbook (home butchering guide)) |
| Coarse then medium | Technique | More even mixture that’s easier to shape (The BBQ Bastard (barbecue technique guide)) |
A single coarse pass is the lowest-effort route to the burger most steakhouse-blend recipes describe. When a patty needs to hold together without turning pasty, run the coarse grind through a medium plate once — the second pass evens out the fat while keeping the texture open.
How to Change Grinding Plates
- Unplug the grinder (or disconnect the crank) and remove the hopper tray.
- Unscrew the retaining ring or end nut and lift off the old plate.
- Pull the blade off the square pin and set it aside — don’t let it drop on the counter edge.
- Reassemble in the same order: auger, blade, plate, ring.
Changing plates is the fastest skill in the kitchen. Start with a 3/8-inch coarse pass for burgers, then swap to a 1/4-inch plate for meatballs in the same session; reassembly takes less time than the grill takes to heat.
The same pound of chuck becomes a loose steakhouse-style patty on a 3/8-inch plate or a fine, sausage-ready mix on a 1/8-inch plate. Texture is a plate decision, not a meat decision.
What this means: the grinder’s number tells you the machine’s size, but the plate tells you the meal. Buy the plate that matches the dish you’re making tonight.
Can You Put Bone in a Meat Grinder?
This is where the internet gets nervous, and with reason. A grinder cuts by pushing food through holes, so bone demands torque — and torque is the one thing a small motor or a hand crank doesn’t have in reserve. The short answer: small poultry bones are within reach of heavy-duty electric grinders with strong motors; manual grinders generally can’t handle bone.
Types of Meat Grinders That Can Grind Bone
- Heavy-duty electric grinders with motors in the 500–1000 W range — the class that can process small poultry bones.
- Manual grinders — not for bone; the crank can’t generate enough torque and the blade loses its edge fast.
- Commercial units with explicit bone ratings — only grind bone if the manual says so.
Risks of Grinding Bone
- Chipped or dulled blades — bone is abrasive, and the knife is the part that does the cutting.
- Overheating the motor — pushing bone through a small grinder stalls the auger and strains the windings.
- Bone fragments in the grind — even with a strong grinder, the result needs a visual check before cooking.
- Extra cleanup — bone leaves marrow and residue in the auger that needs a thorough rinse.
Bone is a torque test. Small poultry bones sit within the capability of heavy-duty electric grinders with strong motors; a manual grinder or a low-watt motor will stall or chip before it finishes the job.
The trade-off: bone grinding is a capability, not a reason to buy. Unless you process whole birds regularly, treat it as a bonus feature and keep the blade for muscle meat.
Is a Meat Grinder Worth It?
For the math, put a pound of whole chuck next to a pound of pre-ground beef. Grinding at home gives you control over the fat ratio, freshness, and texture, and it usually costs less per pound once the machine’s price is behind you. For a household that grinds a couple of times a month, the break-even point arrives quickly.
Pros and Cons of Owning a Meat Grinder
Upsides
- Control over fat content — grind chuck to an 80/20 or 70/30 ratio yourself.
- Freshness — ground meat is at its best within a day or two, and you decide when to grind.
- Texture — a coarse plate gives the loose, steakhouse-style burger that pre-ground packs rarely deliver.
- Versatility — the same machine does burgers, meatballs, sausages, and chili with a plate change.
Downsides
- Setup and cleanup — 10 minutes of assembly and washing per batch, whether you grind 1 pound or 5.
- Counter space — a manual grinder clamps away; an electric model needs storage.
- Upfront cost — from about $30 for a manual unit to $300-plus for an electric model with a 500–1000 W motor.
Cost vs. Benefit Analysis
- Manual: cheapest entry, no motor, ideal for small batches.
- Electric 500–1000 W: faster, handles larger batches, more parts to wash.
- Both use the same blade-and-plate texture system.
Five differences, one pattern: the motor changes the effort, not the texture — the same blade-and-plate rules apply to both.
| Manual grinder | Electric grinder | |
|---|---|---|
| Motor | None — arm power drives the auger | 500–1000 W typical for home models |
| Starter price | About $30 | About $100–$300+ |
| Batch size | Occasional 1–2 lb batches | Regular weekly batches, sausage-making |
| Bone | Not for bone | Small poultry bones only in heavy-duty models |
| Cleanup | Fewer parts, quick rinse | More parts; motor housing stays out of the water |
If a household grinds 2 pounds of chuck a week, the per-pound saving against pre-ground beef covers a $100 electric grinder in a matter of months — and a $30 manual grinder covers itself even faster. Pair the grinder with a solid cooking reference — 400°F to Celsius Conversion: Oven, Fan, Air Fryer Guide — and you control the whole chain from chuck to bun.
You trade 10 minutes of setup and cleanup for control over fat, freshness, and texture — plus a per-pound cost that beats most supermarket pre-ground chuck.
Why this matters: the real cost isn’t the machine — it’s the ritual. If assembly-and-cleanup sounds like a pleasant 10-minute ritual, you’ll save money and eat better; if it sounds like a chore, the grinder becomes expensive shelf decor.
What’s Confirmed, What’s Not Settled
Confirmed facts
- The blade’s flat cutting side faces the grinder plate — the Home Depot product manual (manufacturer assembly guide) is unambiguous on this.
- The plate sets the grind texture; the knife cuts against it — KaTom Restaurant Supply (commercial equipment guide) treats it as a definition.
- Manual grinders can’t process bone; heavy-duty electric models with strong motors can take small poultry bones (Home Depot product manual (manufacturer assembly guide)).
What’s not settled
- The “best” burger plate is a taste call: Salt Rail (home butcher equipment guide) pushes the 3/8-inch coarse, while Butcher’s Handbook (home butchering guide) calls the 1/4-inch the all-purpose pick.
- Very fine plates can make a dense, pasty burger texture that some cooks dislike, according to EatHealthy365 (burger blend comparison).
- Bone capability varies by brand and motor rating, so “heavy-duty” means different things across manufacturers (Wikipedia (encyclopedic reference)).
- The exact origin of #5, #12, and #32 size markings may vary by manufacturer (KaTom Restaurant Supply (commercial equipment guide)).
The pattern: the confirmed facts are mechanical rules; the open questions are taste and manufacturer variation — exactly where uncertainty belongs.
The Assembly Sequence, In Their Own Words
- Two sources, one sequence: the blade goes over the screw, and the blade fits inside the housing.
The names vary by brand, but the mechanics don’t — assembly instructions read the same whether the manual belongs to a hand-cranked relic or a 1000-watt electric unit.
“Insert the grind screw into the main housing. Place the blade over the end of the grind screw. The blade should fit entirely inside the housing.”KitchenAid assembly guide
The same auger-and-plate architecture survives intact, described today in near-identical terms:
“The food to be minced is placed into a funnel on the top of the grinder. From there, the material enters a horizontal screw conveyor.”Wikipedia (encyclopedic reference)
Buying a grinder doesn’t fix burgers by itself; the blade still has to face the plate, and the plate still has to match the texture you want. For the home cook who values a loose, steakhouse-style patty, the choice is clear: grind your own chuck on a 3/8-inch coarse plate once a week, or keep wondering why restaurant burgers taste better than anything from a supermarket pack.
Frequently Asked Questions
What does 32 mean on a meat grinder?
No. 32 is a grinder size number. It refers to compatible head or plate dimensions, not grind coarseness; larger numbers mean larger plates and greater throughput — a distinction KaTom Restaurant Supply (commercial equipment guide) draws when it explains size numbers.
What does the #12 mean on a meat grinder?
A #12 is a mid-size home grinder designation, part of the same numbering system as #5, #8, and #32. It tells you the head or plate dimensions, not the texture of the grind — the plate’s hole diameter controls that.
What is a #5 meat grinder?
A #5 is a small home grinder, suited to modest batches and occasional use. Same rule as every number in the system: the number is about dimensions and throughput, not about how coarse or fine the grind will be.
What all can you do with a meat grinder?
More than burgers. The 1/4-inch plate handles meatloaf, meatballs, and tacos, per Butcher’s Handbook (home butchering guide); the 1/8-inch plate moves into sausage, bologna, and hot-dog-style mixtures; and a coarse-then-medium double pass, as The BBQ Bastard (barbecue technique guide) explains, gives a shapeable blend for stuffed dishes. It also grinds vegetables, cooked beans, and soft ingredients — the same principle behind fillings like the ones in this Paneer Paratha Near Me: Compare Delivery Prices & Nutrition guide.
Who invented the meat grinder?
The hand-cranked meat grinder is credited to Karl Drais, the German inventor who also built an early bicycle, in 1841. His auger-and-plate mechanism is the same one still used in home grinders today.
What can you use instead of a meat grinder?
A food processor works if you pulse, not puree; a sharp chef’s knife handles small batches with a rocking mince; and a meat mallet plus cutting board gets you a rough chop. Each works in a pinch, but none produces the clean, even cut of a blade-and-plate grinder.
What to look for in a good meat grinder?
Motor power in the 500–1000 W range for electric models, stainless steel or cast-iron construction, and a blade-and-plate system that matches the batch sizes you cook. Also check that the manufacturer offers replacement plates and blades in the size numbers you’ll actually use.
More related posts
 How to Season a Beret: Military, Scout & NPCC Methods
 Singapore GE2025 Election Issues: Key Topics & Analysis
 Olivia Dean ‘So Easy (To Fall In Love)’ Lyrics & Meaning
 Louis Vuitton Sues ValueMax Over Trademark Infringement
 Sindhorn Kempinski Hotel Bangkok: 5-Star City Wellness Hotel
 Digo Corporation Pte Ltd – Singapore Contractor Profile & Verification
 Galaxy A10 to Buy: Prices, Deals & Reviews (2024)
